Hi Everybody!
I am so ridiculously excited to be doing my first post for Jaded Blossom! They are a new company that creates products for mostly party favors! How awsome is that?!?! With 4 kids, we always have party invites, decorations, class treats and more to make. Then there are the thank gifts that are always in need! With a larger family, making these things saves a ton of money (which is always good!). And now onto the sneak peek:
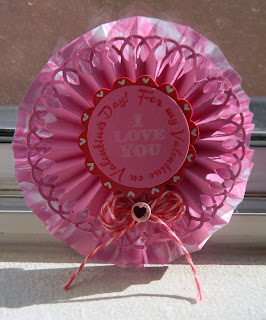
I decided to make a Valentine's Day button. I know my husband will wear this proudly on Valentine's Day! (Only in the privacy of our own home, and where no one can see him, lol!) While I made this one for my husband, I also plan to make other ones for my kids. I thought these would be fun for them to wear to school. These also might be the treat we hand out for their classes. Fun and different! Here are the details:


I am so ridiculously excited to be doing my first post for Jaded Blossom! They are a new company that creates products for mostly party favors! How awsome is that?!?! With 4 kids, we always have party invites, decorations, class treats and more to make. Then there are the thank gifts that are always in need! With a larger family, making these things saves a ton of money (which is always good!). And now onto the sneak peek:
I decided to make a Valentine's Day button. I know my husband will wear this proudly on Valentine's Day! (Only in the privacy of our own home, and where no one can see him, lol!) While I made this one for my husband, I also plan to make other ones for my kids. I thought these would be fun for them to wear to school. These also might be the treat we hand out for their classes. Fun and different! Here are the details:
*Art Philosophy cartridge - 1 3/4" circle, scallop circle
*Martha Stewart scoreboard - rosettes
*EK Success - Border punch
*Timeless Twine - Valentine's Day Bakers Twine
*hot glue gun
*Jaded Blossom Sneak Peek!


*I hand drew the little white hearts for a little added touch :)

*This twine is soooo perfect for all your Valentine treats!
Ugly picture warning!!

*I wanted to show how I did the back. I just took a regular safety pin, opened it up, and then hot glued just the top portion. I really wanted to use what I had and not go buy special pins, or clips!
*This was my test button, so the backs of the rest of them will be MUCH prettier!
I hope you liked my button, and will make some of your own. If you'd like to use this same stamp set, you'll have to wait until Friday (plenty of time to make some for Valentine's Day!) for the Jaded Blossom Stamp Release Blog Hop! . TFL, and hope everyone has a chance to craft today :O)