Showing posts with label Best of Pixar. Show all posts

Tuesday, August 14, 2012

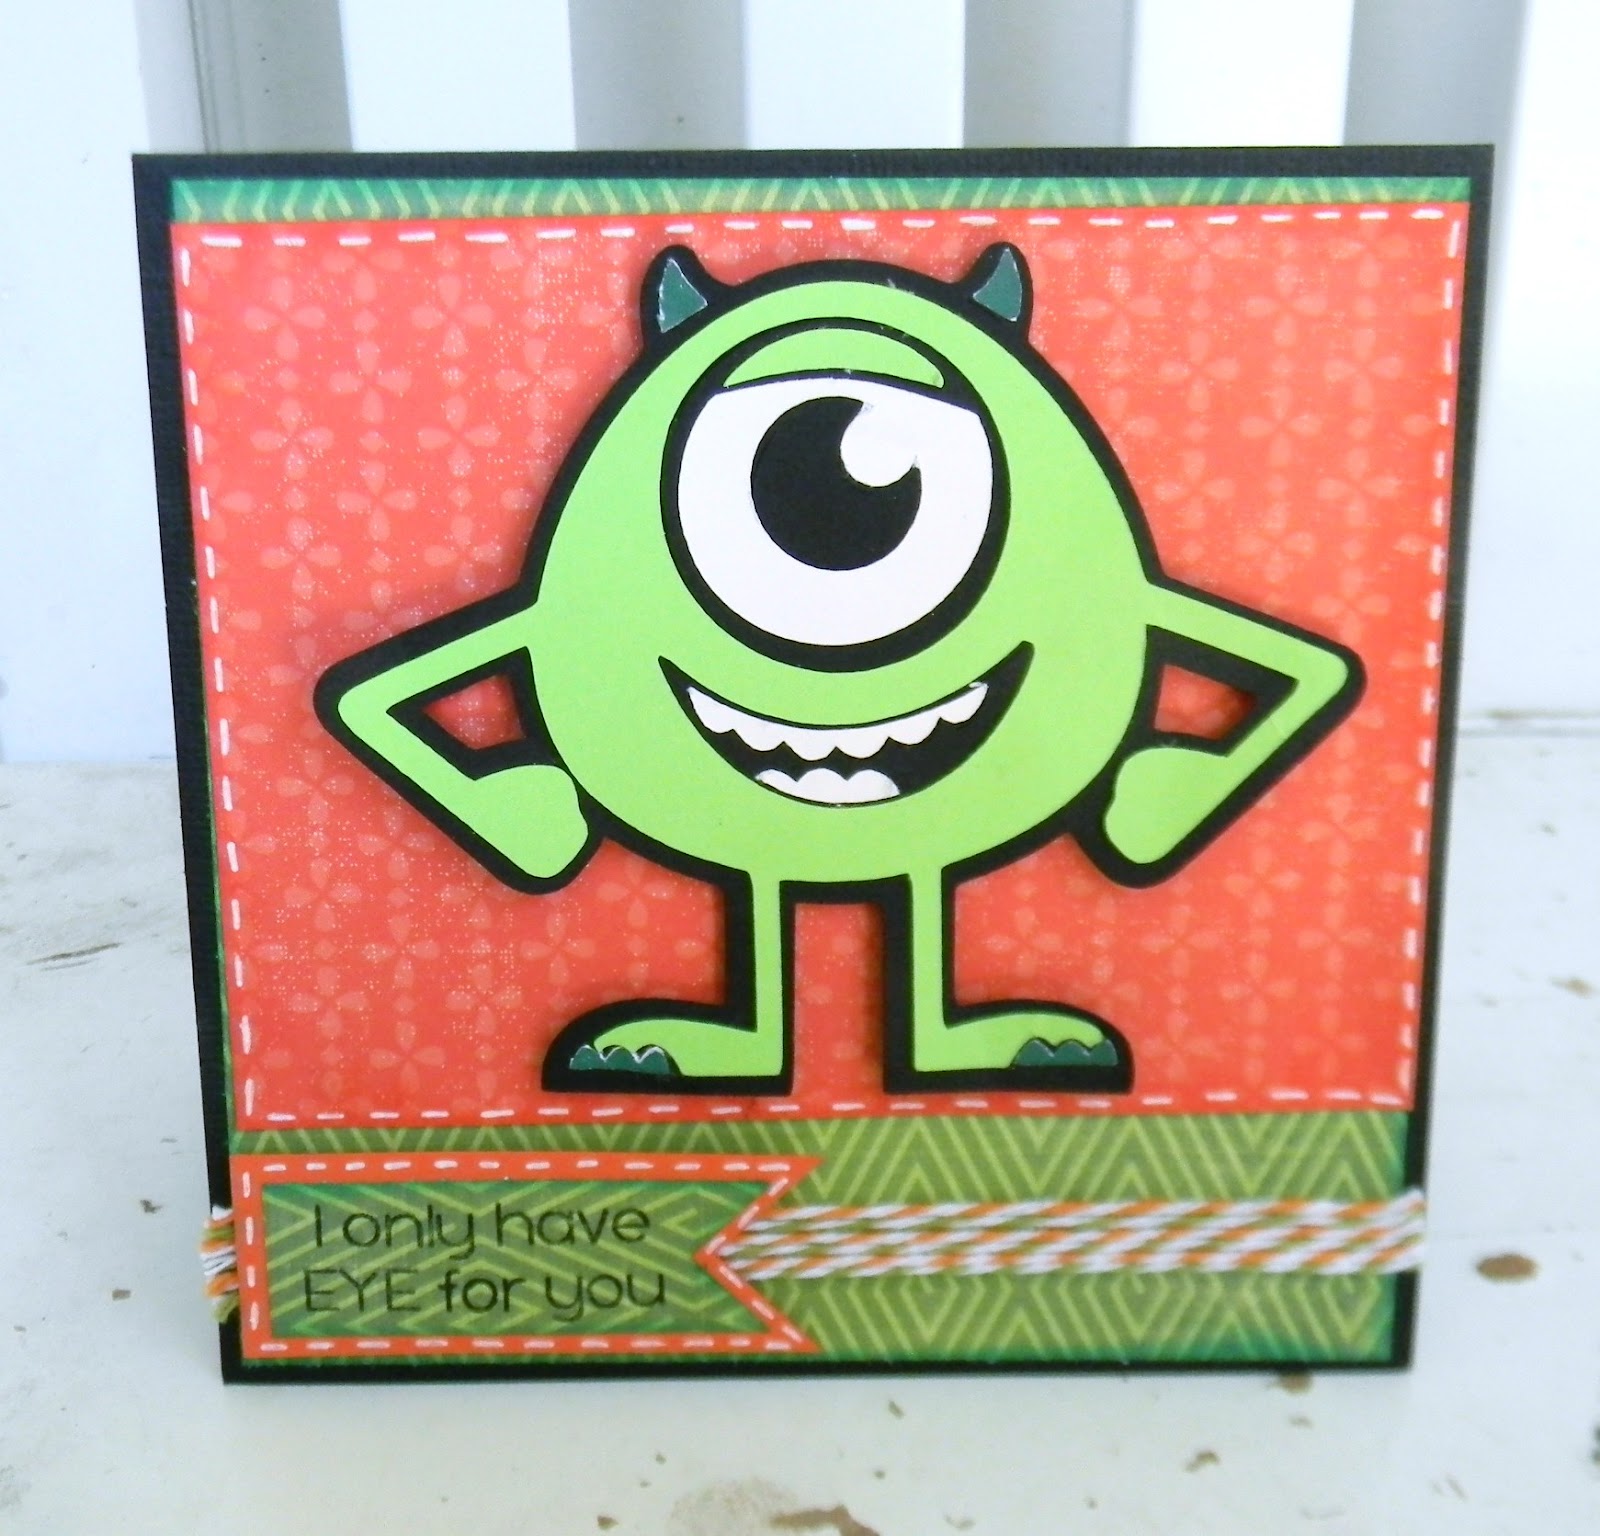
Jaded Blossom Design Team Day - Eye for You Card

Hi Everybody!
Did you love the release from Jaded Blossom last week?!?!  The Monster Mash set was my personal FAVORITE!  Here's a peek at the set:


*Isn't that too awsome?  I love monsters, and more than just for Halloween!!  Here's my project for today:


*Best of Pixar Cricut cartridge - Mike character
*Echo Park - patterned paper
*Timeless Twine - Olive Green, Pumpkin Orange


 I hope you liked my project! Make sure to follow the Jaded Blossom blog for all things JB!! 


Also, don't forget to enter this month's Jaded Blossom Challenge!  It's a school theme, but you can use ANY Jaded Blossom Stamp set for your project!

Jaded Blossom

Click HERE to enter for your chance to win the
SUPER HERO STAMP SET!!

This the first challenge that JB is offering a stamp set as the prize!
If there are over 20 entries in this months challenge we will select TWO winners!!
(To see some projects made with this fantastic set, click HERE.)

TFL, and hope everyone has a chance to craft today :O)

Tuesday, July 3, 2012

Jaded Blossom Release Week - Day 2

Hi Everybody!
Are you ready for day 2 of Jaded Blossom's Stamp Release Week??  Here are the next sets Birthday Kisses, and Sport Kisses!

Here are what the complete sets looks like:


And here is the project I made using both sets:
 
 
**Jaded Blossom - Birthday Kisses, Sport Kisses sets, treat bags
*Best of Pixar Cricut cartridge - Mike figure
*Prima - patterned paper
*Martha Stewart - drippy goo punch


*These treat bags will also be released this Thursday!  They are the PERFECT size for little treats :O)


These stamps are perfect for decorating hershey kisses, rolos, and all kinds of candy! Use a 3/4 inch circle punch to punch them out. 

I hope you liked my project! Make sure to come back tomorrow for another peek at a soon-to-be-released stamp set!! TFL, and hope everyone has a chance to craft today :O)


Monday, June 25, 2012

Mickey and Friends Monday!!


Hi Everybody!
I hope everyone had a fantastic weekend! I'm happy to help your week get off to a good start with some Mickey Magic!  Welcome to Mickey and Friends Monday :O) If you're new to my blog (welcome!), this is the day where I highlight a character cartridge. This is to help any of you who may be a little bit intimidated by these types of cartridges, and to give you some inspiration on how to use them :O)


Today I used the Best of Pixar cartridge to make the cover for my notebook.  I do a kids crafting class every Monday in June, so I thought this would be a fun project for them to make.  I used the icon feature to make it A LOT easier for the kids to put these cuts together.  Here's how it turned out:


Here's how my oldest decorated hers:


Here's how my middle daughter decorated hers:


*They both HAD to use the same paper! LOL


Here is a close up of Mike:


*This was again using my favorite feature on the character carts, the icon feature!


The kids in this age group are from 8 - 15 so this was something they all could make, and that they all liked!  TFL, and hope you have a Magical Monday!!

Friday, April 13, 2012

Lucky Fin Tag

Hi Everybody!
Today is a good day! It's not only time for the next 52 Tags in 2012 Challenge.....


it's also time for me to share .............


another Timeless Twine design team project with you! And since I always make my projects work as hard as they can, it's also.............
Disney week! 


This is not a hop... it is just a group of us crafters that have all promised to ONLY post Disney related projects on our site this week (including Hello Kitty, Pixar, Pooh, Sesame Street, etc.) Some people might post a new project every day; others may only get a few projects out all week, but we will all be showcasing DISNEY (or some other animated character).


I have a twine-fully happy tag to share today. Here are the details:

*Best of Pixar Cricut cartridge
*Timeless Twine = Olive Green
*Jaded Blossom = sneak peek of release that starts TODAY @ 4 pm PST!!!

 **********************

*I thought this green twine would work perfectly as seaweed for Nemo :O)


*Luckily I also had some fishy brads that are great accents!


*I also put him on an Action Wobble!!


Don't miss the new stamp release from Jaded Blossom that starts TODAY @ 4 pm PST!!!


I hope you enjoyed my project! Don't forget to check out the
Timeless Twine blog for more twine-ful inspiration :)


You can also check out the 52 Tags In 2012 Challenge.
Please click HERE to enter.


TFL, and have a twine-tastic day :O)

*****************************


Monday, January 9, 2012

Mickey And Friends Monday!


Hi Everybody!
Welcome to the first Mickey and Friends Monday of 2012!  I hope to be able to give you lots of Disney inspiration this year (with some guest designer help!!)  :O)  The first project for this year comes to us from Lisa over at Pretty Paper Ribbons.  Here is her project:


For all the details on how she made her project, please head on over to see her blog post HERE


Isn't that so awsome?!?!  Please make sure to come back next Monday for some more Disney inspiration.  Have a magical Monday!!


Wednesday, December 28, 2011

Cooking With Cricut - Favorite Project of 2011 Challenge


Hi Everybody!
This week we are looking back at the projects we made this past year and re-posting our favorite projects. We want to see your favorite projects too! So head back in time and re-post the project that you think was one of your favorites.

I chose to re-post this Nemo Frame the Happy Hauntings cartridge and Best of Pixar cartridge. If you didn't see it the first time around I am glad you get this chance to check it out. If you did see it, I hope you enjoy it the second time around too!

I love making home decor things with my Cricut, and this project is one of my favorite things to make! Using the frame on the Happy Hauntings cartridge (I know, I just love Halloween and can’t let it go, lol!), my kids and I made this frame for my husband for Father’s Day. While it was a Father’s Day present, we made it so it could be used for any occasion. Here are the details:
Supplies:
  • Happy Hauntings cartridge
  • Best of Pixar cartridge
  • 3 pieces of thin chipboard (or cereal boxes)
  • blue, orange, white and green cardstock
  • green, and crystal Stickles
You’ll need to cut your supplies in the following sizes:
P. 68 in the Happy Hauntings handbook:
  1. frame (frame + shift key) cut @ 7″
  2. back of frame (layer 1 key) cut @ 7″
  3. frame stand (layer 1 key + shift) cut @ 7″
P. 21 in the Best of Pixar handbook:
  1. Nemo1 cut @ 2.25″
  2. orange layer (Nemo1 + shift key) cut @ 2.25″
  3. white layers (layer 1 key)
  4. tounge (layer 1 + shift key)
P. 23 in the Best of Pixar handbook:
  1. Marlin cut @ 2.33″
  2. orange layer (marlin +shift key) cut @ 2.33″
  3. white layer (layer 1 key) cut @ 2.33″
P. 29 in the Best of Pixar handbook:
  1. seaweed (icon key) cut @ 5″
  2. seaweed (icon + shift key) cut @ 5″
P. 33 in the Best of Pixar handbook:
  1. orange fish (icon key-use hide contour to hide little fish) cut @ 4.5″
Now onto the project:


Before making your project, make sure the chipboard you are using is not too thick. To give you an idea, the chipboard on top is from cereal boxes. The one on the bottom is some packaging that came with photos.


Make sure you use a VERY sticky (or new) mat when cutting chipboard. If you don't, the chipboard may slip when being cut. Carefully peel back the chipboard.


This is what you should have once you have cut
all your pieces out for the frame itself. The wavy blue layer goes onto the wavy chipboard piece. The solid wavy piece goes behind the wavy chipboard piece. The last piece is the stand. This gets adhered to the back of the solid wavy piece.


I layed out all the cuts on my Gypsy. I group all the pieces by color. The pieces in the upper left are the black cuts, and the lower left are the orange cuts. The upper right are the white cuts, and the lower right are the pink cuts (Nemo's tounge).


Here's how the paper's match up with how I layed it out on my Gypsy.


Here's a tip for the Disney cuts. They all have the complete design cut on them, and the layers have a little black mat around them (not a shadow cut). This means they will not line up with the outside. Use the lines on the inside of the cuts as a guide.


Here are all the frame pieces put together.


Here's the back of the frame put together.


Since this is a paper frame, you need to give it a little extra support. Punch a hole towards the bottom of the stand, and in the frame back. Thread the ribbon through one hole and tie a knot. Do the same with the other hole. This ribbon will keep the frame from collapsing

.

I used the Animated Greetings set. This was the perfect sentiment!!


Add some crystal Stickles for some 3D bubbles, pop dot some seaweed and you get........


......this super cute frame to give someone special!


There ya go! I hope you like it, and will try one yourself.  If you do, please post it on the Pink By Design messageboard so we can all check it out!! TFL, and be sure to check out all the challenges, swaps, and more going on in the community :o  

Please be sure to visit the Cooking With Cricut blog to see what the other design team members have cooked up for you this week. You have until next Tuesday to enter this week's challenge for a chance to win a fabulous prize from our sponsor, Papercraftingworld.com. Click HERE to enter.

Thursday, September 29, 2011

Welcome to the Fall & Halloween Blog Hop!


Hi Everybody!
I am so proud to welcome you the the Fall and Halloween Blog Hop featuring the Thankful Thursday Design team.  Thankful Thursday is a challenge I have here on my blog.  The whole reason for Thankful Thursday is to encourage crafters to get their kids (of any age or the kids in their lives), or ANY family member and craft away!!  Since I am a busy mom of four, I don't always have time to craft and spend time with family.  So I figured why not combine the two??  Every two weeks there is a new challenge and these ladies blow me away with their design team projects and this time is no exception!  I'm so lucky to have such a great team :OD 

Note: The current Thankful Thursday Challenge will be extended until Oct. 5th.  You can enter it HERE.  There's another great prize available there too!

Halloween is my FAVORITE holiday, so here is my project that I made:
*Best of Pixar cartridge
*Pink By Design = sentiment from Guess Who set
*small empty paint bucket from Michael's
*Core'dinations paper
*red, grey vinyl from my stash
*ribbon from my stash

*I think this would be the perfect little trick-or-treat bucket for my little one year old!


*I LOOOVE this monster cut!


*Here's another view of the monsters.

*I am so in love with Core'dinations paper!  They have different kinds, but the one I used has one color on the outside, and the core is a different color!  This one is black and orange.
*I embossed it, and then used a sanding block to make the orange pop even more!


I can't wait to get started making more Halloween decorations!  And what would Halloween be without CANDY!!!!


I have this cart, and there are a TON of amazing images on it.  Would you like to win it?  To enter:

1. Leave a comment on this post.
2. Leave a comment on EVERY blog in this hop.
3. Please be a follower of my blog (you'll be oh-so-happy you did!)

Now head on over to see the uber talented Cheryl as the next stop in the hop!

Here's the lineup in case you get lost or need to stop along the way:

Tuesday, June 21, 2011

Pink By Design! And a PBD Sale!!!


Hi Everybody!
I'm so excited 'cause today is my Pink By Design design team post on the PBD blog! I love making home decor things with my Cricut, and this project is one of my favorite things to make! Using the frame on the Happy Hauntings cartridge (I know, I just love Halloween and can't let it go, lol!), my kids and I made this frame for my husband for Father's Day. While it was a Father's Day present, we made it so it could be used for any occasion.  For a VERY detailed tutorial, head on over to my post on the Pink By Design blog for all the sizes, directions, and pictures.


I hope you like it, and will try one yourself.  If you do, please post it on the Pink By Design messageboard so we can all check it out!! TFL, and be sure to check out all the challenges, swaps, and more going on in the messageboard :o

(PSSSSSSST! This is also the set that's on sale for Stamptastic Tuesday, so head on over to the Pink By Design store and grab it before it sells out!!!!)

Copyright 2010
Blog Design by The Shabby Vanity

With Tweaks and Additions by VK Design Company